Friday, November 12, 2010

Chocolate cake with Strawberries


This cake was for a friend's office party. His co worker was getting married so this could be considered a groom's cake. We decided on a 1/2 vanilla, 1/2 chocolate cake with chocolate buttercream and strawberries. Getting the cake to be 1/2 vanilla 1/2 chocolate ended up being the unexpected  challenge but thanks to the very informative forums on cakecentral.com it worked out well in the end.
The recipes I used for the cake were the yellow WASC cake which I have posted before and the Hershey's perfectly chocolate cake also posted in prior posts. The buttercream was the cooked chocolate frosting I posted recently. It's a real silky buttercream and a non-crusting kind which means I could not smooth it like I usually do. However I think I made up with the chocolate covered strawberries on top.
The strawberries are very easy to do if you have the right ingredients and method.


Ingredients
Some kind of chocolate (Chips, buttons, wafers etc)
Crisco or some kind of fat (maybe vegetable oil will work)
Strawberries
Prepare the strawberries:
Wash the strawberries and dry them thoroughly (I mean thoroughly else your chocolate will seize).
I used a hair dryer on cool temp to dry them off, thats after I wiped each one carefully with a paper towel.
Prepare the chocolate: 
You can buy the Dolci Frutta containers at any grocery store. They usually display them right next to the berries or in the baking aisle. They're chocolate wafers in a microwaveable paper container. Or you can buy the candy melts in various colors from Michaels or any craft store or even Party City. I used Dolci for the dark and light cocoa candy melts for the light ones on the cake.
You can even use chocolate chips but they melt quite thick. For all kinds of chocolate melt them at 30-40% power at 30 second bursts, stirring to disperse the heat until they are melted  smooth. Make sure the chocolate does not get too hot or it will scorch/burn/seize. Also no moisture of any kind must get into it or it will seize so make sure everything you use is dry. If the chocolate is thick and not pourable, add about 1/2 tsp crisco and stir it well (carefully so as to not get air bubbles in). 
Once the chocolate is smooth, somewhat pourable, you're ready to dip.
Hold the fruit by the leaves, dip into the chocolate, roll it around to get a good coat. Shake or tap it to drop the excess and place on a wax paper to dry.
It should firm up in about 10 mins or place in the refrigerator for 2-3 mins.
For the white drizzle, melt white chips or wafers, add crisco to thin, put in a ziploc bag, snip a tiny part of the corner off. Test the drizzle on wax paper and then drizzle across the strawberries.
That's it! Its very easy to do once you get the hang of working with chocolate and have them on hand.

One more note:  The strawberries are best eaten immediately or within a few hours of making them. After 8-9 hours, I have noticed they begin to let out some moisture and they don't look as good.
Enjoy!


Monday, November 8, 2010

Cream Cheese Brownies

This is my current favorite recipe...and it has held its position since the last year or so. Its somewhere between fudgey and cakey with lots of chocolate bits, so it seems to be well liked by everyone. It can be made pretty quickly too since you don't need to soften the butter. It usually takes me about 30 mins or less to prep and mix and 30-35 mins to bake.

For the chocolate part:
4 oz semi sweet chocolate (4x1 oz Baker's Semi Sweet chocolate squares)
1/2 cup or 1 stick of butter (salted)
3 eggs
1 1/2 cup sugar
1 cup flour
1 cup chocolate chips (I use milk chocolate chips)
1 tbsp vanilla extract
1 pinch of salt
1 tbsp instant coffee (optional)

For the cream cheese part:
8 oz or 1 block of cream cheese softened
1 egg
1/3 cup sugar
1 tsp vanilla

Preheat your oven to 350 deg.

Put the chocolate squares and butter in a saucepan and melt on lowest flame. I'm supposed to chop the chocolate but I've been lazy of late and I dump it all in and compensate by some more frequent stirring so it doesn't burn. Make sure it doesn't get too hot.

Meanwhile beat the eggs and sugar until light and creamy (about 3-4 minutes). Note: Its best for eggs to be at room temp for baking anything. I usually take the eggs out of the fridge and submerge them in a bowl of  warm water for a couple of minutes since I'm always baking at short notice.

Once the egg sugar mixture is light and creamy, add the vanilla, salt and instant coffee powder and stir. Coffee seems to enhance or deepen the chocolate flavor but the brownies come out good even without it.
Now add the butter and chocolate mixture while stirring (to avoid cooking the eggs)

Fold in the flour with a spatula but don't over do it, just 15 strokes should be enough. Add the chocolate chips (reserve a few to sprinkle on top) and fold a few times. Stir or fold just enough so no streaks or lumps of flour can be seen. Too much mixing will result in a tougher brownie. In fact, I do everything by hand once I begin adding flour.

Another note about flour: Measure flour by spooning it into a cup and leveling off. Dragging a cup through flour will pack it with too much flour resulting in a denser brownie. Also I sift flour by dumping the cup into a big strainer over my mixing bowl..its much faster. Nowadays, I find that just whisking the flour also aerates it enough so I don't need to sift unless I'm making a light airy cake.

Line a 13x9 pan with a long piece of aluminium foil leaving some extra overhang over 2 sides to use as handles later and spray well with Pam. Dump the chocolate mixture into it spreading it to reach the sides.

Now blend the cream cheese and sugar well until relatively smooth. Add the egg and vanilla and blend at medium speed just enough to incorporate the egg. Stir a few times with the spatula so any cream cheese along the sides of the bowl mixes in.

Plop giant spoonfuls into the chocolate mixture and then drag the end of a butter knife through the white and dark patches to swirl and marble the mixture. Sprinkle the reserved chocolate chips over the top for a nice contrast.

Bake in the oven for about 35 minutes or so. Check at about 30 mins. A toothpick poked in the center and pulled out should have sticky crumbs on it..but should not look like batter (underdone) and should not pull out clean (overdone). I always err on the underdone side since it will continue to cook for a few minutes as it cools.

After about 10-20 mins of cooling, pull the brownie slab out with the aluminium foil overhang. Cut with a serrated knife into small squares.

Variations: You can skip the cream cheese part and they still yield some awesome chocolate brownies. Add chopped walnuts for some crunch or mint chips for a chocolate-mint version.

I'll update this post with pictures later. I forgot to take any pics this time!

Feel free to let me know if you have any questions.

Saturday, October 23, 2010

What's cooking...part 2

OK...Details as promised:
Cookies are the same No Fail Sugar Cookies with Royal Icing tinted Halloween purple that I used for making the Fall Cookies.
The topper is made of molded chocolate. I got the mold recently at Candyland Crafts in Somerville and the Slime Green candy melts I used are from Michaels. These toppers are super easy to make. Just melt candy melts in a microwave, spoon into the mold cavities. Tap on the counter top to release bubbles, and place in the fridge for about 10-15 minutes. They pop out easily once chilled.

The Hershey's Perfectly Chocolate chocolate cake is my go to chocolate cake recipe now. I have used it before to make the Ganache cake. So far it has not failed me.
The buttercream is a new recipe that I was a bit skeptical about because it uses flour, and is cooked like a pudding, but it turned out very well in the end. The texture was a bit too soft for piping rosettes but I think it was coz' the kitchen was very warm with all the baking. I think about 5 to 10 mins in the fridge should have firmed it up nicely. It was a bit too salty for my taste so next time I plan to sub with unsalted butter and some salt to taste.
Here's the recipe and tutorial from another blog  Our Best Bites:

Hubby rated the cake 8/10 and my DDDDS rated it 10/10...woohooo!


What's cooking?

Pumpkin and Halloween themed cookies for the school Halloween bingo event and Chocolate cake with lots of frosting as requested by hubby. Recipes and directions coming up in the next post.


After Arsh's decorating:

Saturday, October 16, 2010

Oreo Truffles


I just realized that I can make these truffles in less than 2 hours. They only need 3-4 ingredients and they look like they took a lot of effort and they taste delicious (imo)!
I've seen the recipe with some slight variations on Bakerella's site (check out www.bakerella.com for some  insanely cute creations) and also on the Kraft website.


Oreo Truffles:
1 pkg Oreos (regular kind not double stuffed) minus 9 cookies..i.e about 36 cookies.
1 8 oz pkg cream cheese at room temp...they taste good with the light cheese too.
1 pkg Wilton white or milk chocolate candy  melts.

Grind the cookies in a food processor as fine as you can get it, even med coarse crumbs are fine. Mush in the cream cheese and mix well until it becomes a dough. Pinch off pieces of dough and roll into a ball. Put them on a wax paper lined plate and put them in the freezer for 10-15 mins. While they're in the freezer, split the candy melts in 2 microwavable glass bowls and put one of them in the microwave. Melt the candy as per the directions. I add a 1/2 tsp of Crisco to the melted chocolate to thin it out a bit.
Take the balls out the freezer and reroll the now firm dough into rounder balls (they may have flattened in the freezer).
Drop them one by one in the chocolate, dip, cover, drain, place on wax paper to harden.

This takes some practice and some playing around with tools. What works for me is 2 forks and a spoon. I drop the ball in, use the small spoon to spoon chocolate over the ball. Then use one fork to lift it, tap it firmly to drop the excess chocolate through the tines. Then use the 2nd fork to slide the ball carefully from the fork onto the wax paper.

Start melting the 2nd bowl of chocolate so it will be ready once you're thru with 1/2 the balls.
Dip all of the truffles and place on the wax paper to dry. I pop the tray into the fridge for about 5-10 mins to firm up.
While in the fridge, melt about 2 tbsp of milk chocolate chips in the microwave. Spoon it into the corner of a small ziploc bag. Snip off the corner and try drizzling the chocolate on a plate or paper. Take the truffles out of the fridge and drizzle the chocolate over the them. 
Pop them back into the fridge for atleast 10 mins to harden.
Take them out, trim or break off any excess chocolate drips (use a knife for big blobs) and put them in pretty mini cupcake liners. You should be able to make about 36-42 truffles with this recipe.
Note: You can use any chocolate in place of the candy melts. The candy melts are easier to melt and handle and do not clump like regular chocolate can. I have used regular white chocolate chips in the past. Just keep some Crisco (dalda? vanaspati? some kind of fat with no water content) handy to thin it out else it can get very messy and frustrating. 


Sunday, October 10, 2010

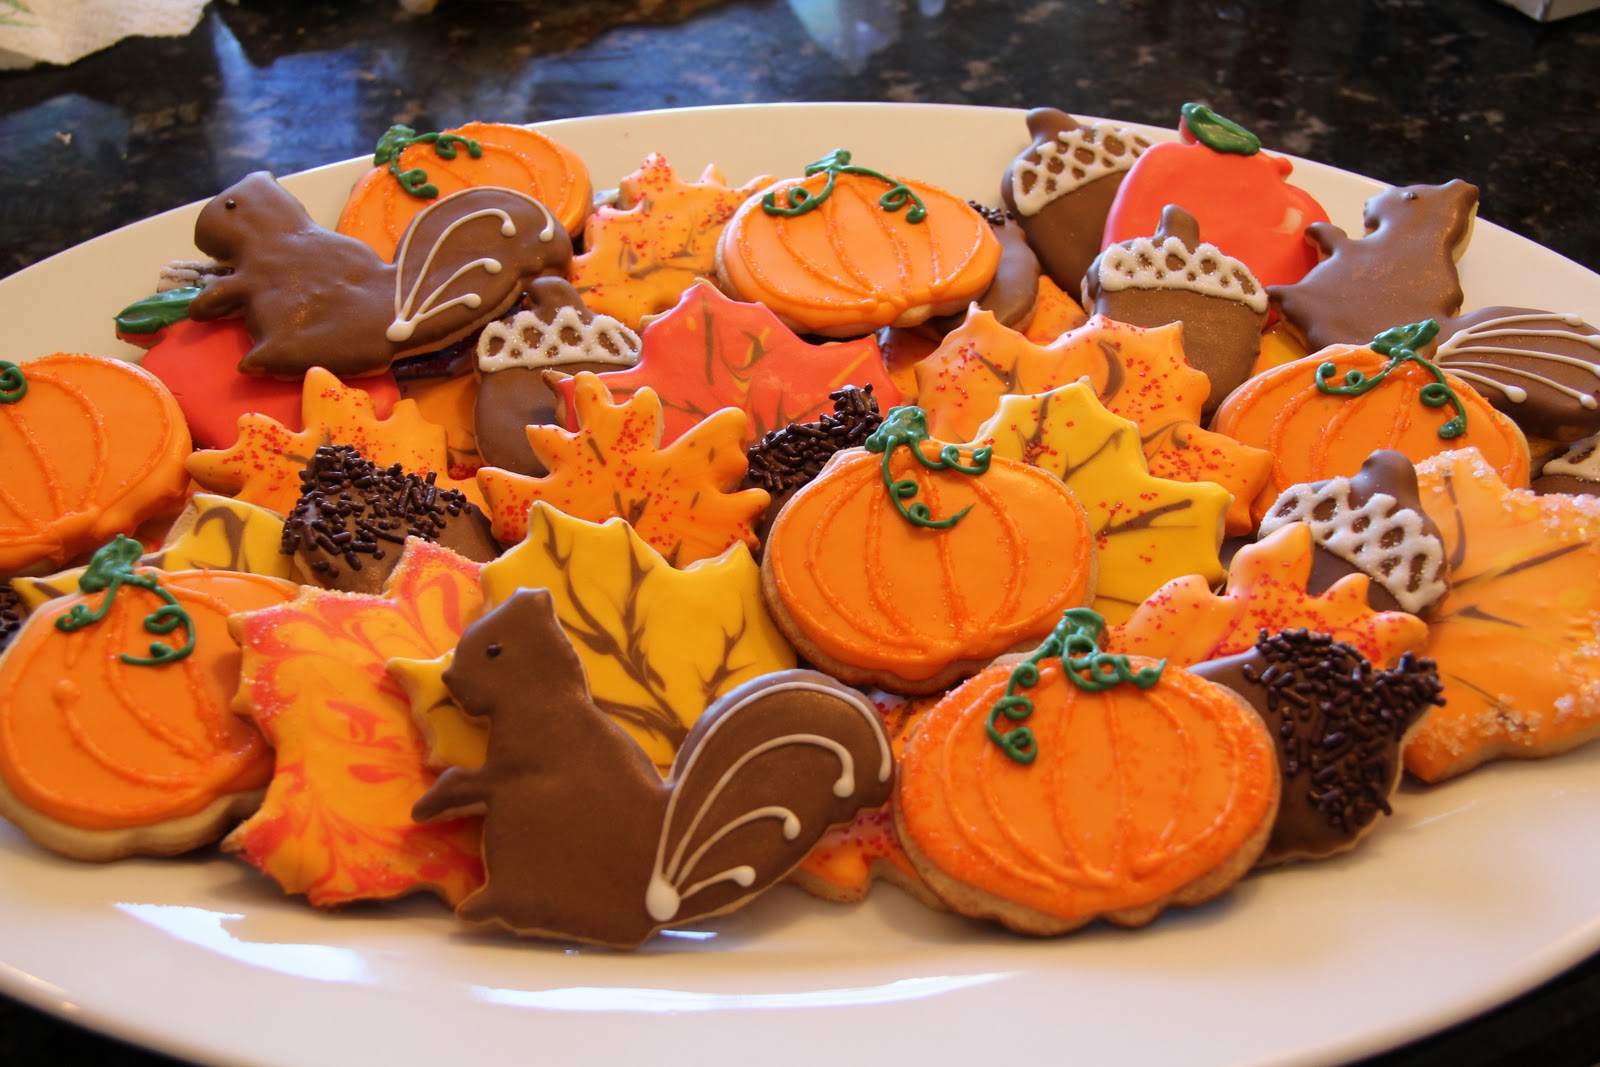
Cookies for Fall


Made these last week for a friend's girl scout meeting. I used the No Fail Sugar Cookie recipe (NFSC) from Cake Central and Sweetopia's Royal Icing recipe. I preferred the NFSC recipe over Sweetopia's this time around...the recipe calls for less butter and more flour so it was easier to work with but taste wise seemed quite similar. Both cookie recipes don't spread a lot so they retain the cutter shapes well.
The icing/decorations were all trial and error to see what looked best. My favorites were the acorns made with the chocolate jimmies and painted with edible copper luster, the red oak leaves made using marbled red food color during dipping and the sycamore that just won me over by the detailed shape of the cookie. Also liked the pumpkin which I've made before but this time dressed it up with orange sprinkles. The green stems and tendrils are made from green candy melts. 

If you are interested in making iced sugar cookies, you must must read Sweetopia's detailed tutorials on making the icing, coloring, and piping. And her cookies are amazingly detailed and impossibly cute! 
Icing recipe and directions:
Cookie recipe:
Notes:
- Wilton candy melts are available in various colors at Michaels ACMoore and other craft stores. I keep a few colors handy.
- The royal icing recipe calls for Meringue powder which is available in better groceries and craft stores and tends to be relatively expensive. But usually you can get atleast 3 batches of icing from one container. I buy Chefmaster brand meringue online wherever I can get a good deal but have used Wilton brand also.
- The cookie recipe makes atleast 70-80 cookies. So I used half the recipe and froze the rest of the dough.
- The icing recipe makes enough to ice 40-50 cookies comfortably.


Wednesday, October 6, 2010

Birthday Cake!


Made for a friend's 5 year old daughter's birthday party at the dance studio. The cake is the basic WASC recipe with a tinge of citrus flavoring. The frosting is vanilla buttercream. The cutting cake has 3 layers with chocolate pudding filling.  What is WASC? WASC is short for White Almond Sour Cream cake which is a misnomer for me since this cake isn't white and there's no almond in it. Its sort of a doctored cake mix recipe which tastes almost like a scratch cake but is a reliable/stable cake. The recipe makes about 60-72 or so mini cupcakes, 36 or so regular cupcakes or  4x6 inch rounds or 3x8 inch rounds or 2x tall 9 inch rounds or 1x12inch round.

Here's the recipe from CakeCentral:

The Buttercream is American Buttercream so there are no eggs in it. 
I use SeriousCake's Buttercream recipe which makes around 6 cups or so of icing. I always have leftovers.
Here's her recipe:
I recommend watching all her videos for icing/decorating cakes, piping flowers etc. She's very very good!!

The drop flowers on the cake are made with the 2D (closed star) tip from Wilton and the rosettes on the cupcakes with the 1M (open star) tip. They're very very easy and quick to do...youtube has tons of tutorials.
Everyone including me liked the look of the cake. I didn't taste the finished cake with the filling so I really hope they liked it!!